This section is from "Scientific American Vol XXIV. No. 12", by Munn & Co.
From Scientific American Vol XXIV. No. 12. March 18, 1871
Also available from
Amazon:
Scientific American Science Desk Reference.
Splicing is a method of joining fiber or wire rope by unlaying strands of both ends and interweaving these strands together. The general types of splices are
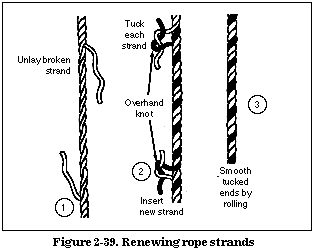
When one strand of a rope is broken, it cannot be repaired by tying the ends together because this would shorten the strand. Repair it by inserting a strand longer than the break and tying the ends together (see Figure 2-39).
The short splice is as strong as the rope in which it is made and will hold as much as a long splice (see Figure 2-40).
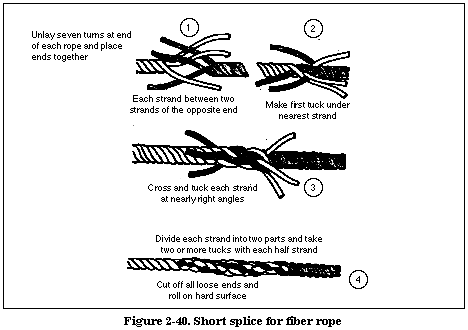
However, the short splice causes an increase in the diameter of the rope for a short distance and can be used only where this increase in diameter will not affect operations. It is called the short splice because a minimum reduction in rope length takes place in making the splice. This splice is frequently used to repair damaged ropes when two ropes of the same size are to be joined together permanently. Cut out the damaged parts of the rope and splice the sound sections.
Use the eye or side splice to make a permanent loop in the end of a rope (see Figure 2-41).
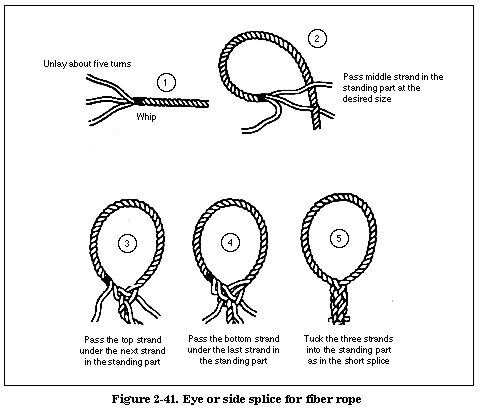
The loops can be used to fasten the rope to a ring or hook and can be made up with or without a thimble. Use a thimble to reduce wear. Use this splice also to splice one rope into the side of another. As a permanent loop or eye, no knot can compare with this splice for neatness and efficiency.
Use the long splice when the larger diameter of the short splice has an adverse effect on the use of the rope; use it also to splice long ropes that operate under heavy stress (see Figure 2-42).
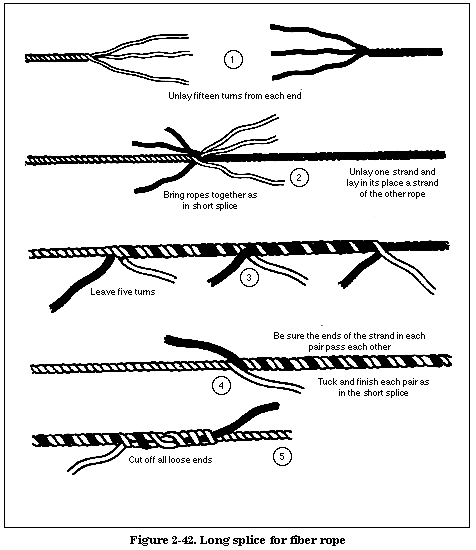
This splice is as strong as the rope itself. A skillfully made long splice will run through sheaves without any difficulty. The ropes to be joined should be the same lay and as nearly the same diameter as possible.
When you are splicing the end of a rope to prevent unlaying, and a slight enlargement of the end is not objectionable, a crown splice may be used to accomplish this (see Figure 2-43).

No length of rope should be put into service without having the ends properly prepared.
In splicing wire rope, it is extremely important to use great care in laying the various rope strands firmly into position. Slack strands will not receive their full share of the load, which causes excessive stress to be put on the other strands. The unequal stress distribution will decrease the possible ultimate strength of the splice. When using splices in places where their failure may result in material damage or may endanger human lives, test the splices under stresses equal to at least twice their maximum working load before placing the ropes into service.
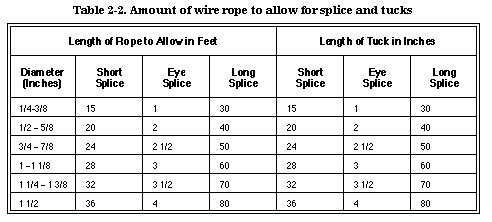
Table 2-2 shows the amount or length of rope to be unlaid on each of the two ends of the ropes and the amount of tuck for ropes of different diameters. As a rule of thumb, use the following:
Only a few tools are required to splice wire rope. In addition to the tools shown in Figure 2-44,
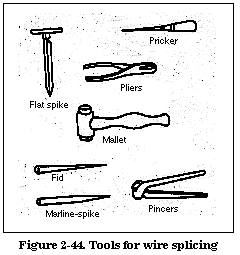
A hammer and cold chisel are often used to cut ends of strands. Use two slings of marline and two sticks to untwist the wire. A pocket knife may be needed to cut the hemp core.
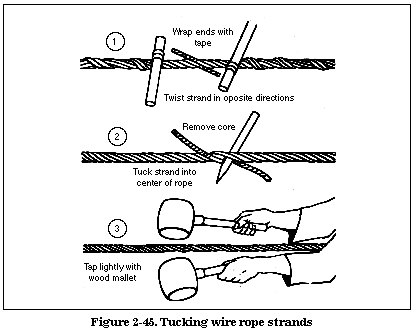
A short splice develops only from 70 to 90 percent of the strength of the rope. Since a short splice is bulky, it is used only for block straps, slings, or where an enlargement of the diameter is of no importance. It is not suitable for splicing driving ropes or ropes used in running tackles and should never be put into a crane or hoist rope. The wire rope splice differs from the fiber rope short splice only in the method by which the end strands are tucked (see Figure 2-45).
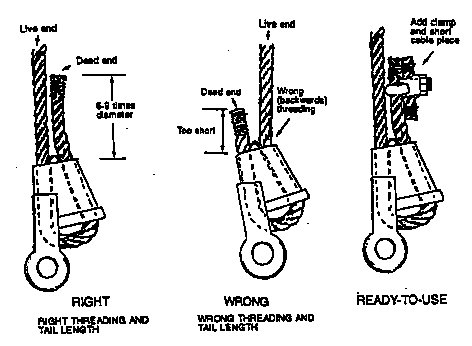
An eye splice can be made with or without a thimble. Use a thimble for every rope eye unless special circumstances prohibit it (see Figure 2-46).
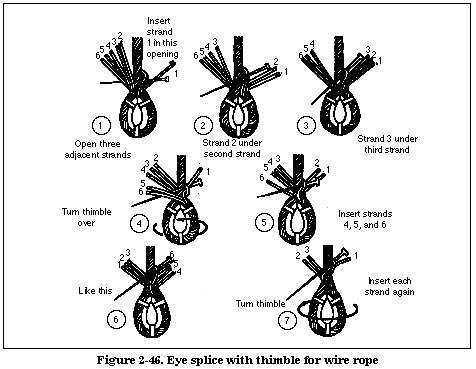
The thimble protects the rope from sharp bends and abrasive action. The efficiency of a well-made eye splice with a heavy-duty thimble varies from 70 to 90 percent. Occasionally, it be-comes necessary to construct a field expedient, called a hasty eye (see Figure 2-47).
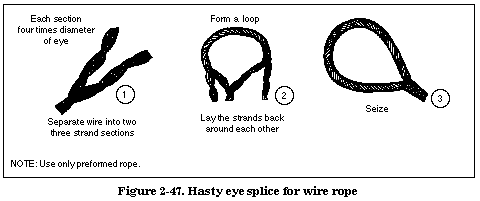
The hasty eye can be easily and quickly made but is limited to about 70 percent of the strength of the rope; consequently, it should not be used to hoist loads.
Use the long splice to join two ropes or to make an endless sling without increasing the thickness of the wire rope at the splice (see Figure 2-48).
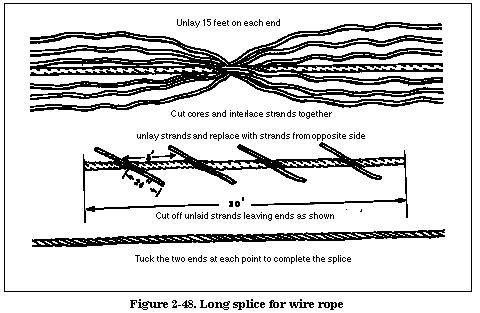
It is the best and most important kind of splice because it is strong and trim.
The directions given in Figure 2-48 are for making a 30-foot splice in a three-fourths inch regular-lay, round-strand, hemp-center wire rope. Other strand combinations differ only when there is an uneven number of strands. In splicing ropes having an odd number of strands, make the odd tuck at the center of the splice.
In splicing a round-strand, Lang-lay rope, it is advisable to make a slightly longer splice than for the same size rope of regular lay because of the tendency of the rope to untwist. Up to the point of tucking the ends, follow the procedure for regular lay. Then, instead of laying the strands side by side where they pass each other, cross them over to increase the holding power of the splice. At the point where they cross, untwist the strands for a length of about 3 inches so they cross over each other without materially increasing the diameter of the rope. Then finish the tucks in the usual manner.
Most of the attachments used with wire rope are designed to provide an eye on the end of the rope by which maximum strength can be obtained when the rope is connected with another rope, hook, or ring. Figure 2-49
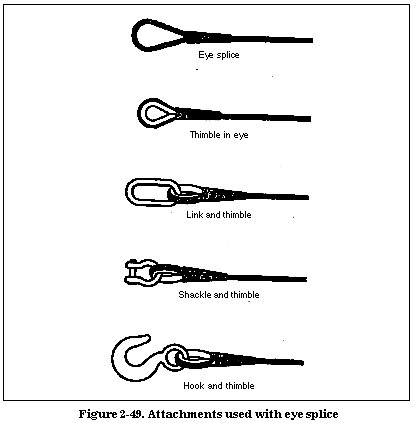
shows a number of attachments used with the eye splice. Any two of the ends can be joined together, either directly or with the aid of a shackle or end fitting. These attachments for wire rope take the place of knots.
An end fitting may be placed directly on wire rope. Fittings that are easily and quickly changed are clips, clamps, and wedge socket.
Wire rope clips are reliable and durable (see Figure 2-50).
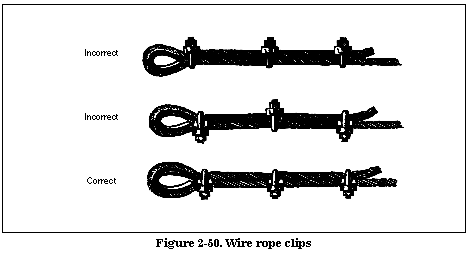
They can be used repeatedly in making eyes in wire rope, either for a simple eye or an eye reinforced with a thimble, or to secure a wire rope line or anchorage to another wire rope. The number and spacing of clips and the proper torque to be applied to the nuts of the clips are shown in Table 2-3.
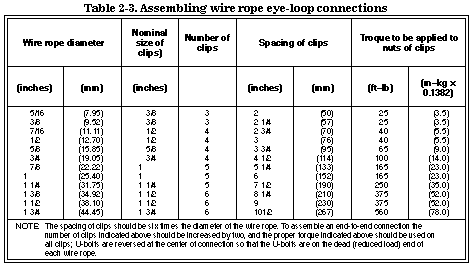
After you install all clips, tighten the clip farthest from the eye (thimble) with a torque wrench. Next, place the rope under tension and tighten the clip next to the clip you tightened first. Tighten the remaining clips in order, moving toward the loop (thimble). After placing the rope in service, tighten the clips again immediately after applying the working load and at frequent intervals thereafter. Retightening is necessary to compensate for the decrease in rope diameter that occurs when the strands adjust to the lengthwise strain caused by the load. Position the clips must so that they are immediately accessible for inspection and maintenance.
A wire clamp can be used with or without a thimble to make an eye in wire rope (see Figure 2-51).
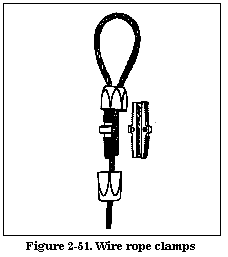
Ordinarily, use a clamp to make an eye without a thimble. It has about 90 percent of the strength of the rope. Tighten the two end collars with wrenches to force the clamp to a good snug fit. This crushes the pieces of rope firmly against each other.
Use a wedge socket end fitting when it is necessary to change the fitting at frequent intervals (see Figure 2-52).
The efficiency is about two-thirds the strength of the rope. It is made in two parts. The socket itself has a tapered opening for the wire rope and a small wedge to go into this tapered socket. The loop of wire rope must be inserted in the wedge socket so that the standing part of the wire rope will form a nearly direct line to the clevis pin of the fitting. A properly installed wedge socket connection will tighten when a strain is placed on the wire rope.
The basket socket end fittings include closed sockets, open sockets, and bridge sockets (see Figure 2-53).
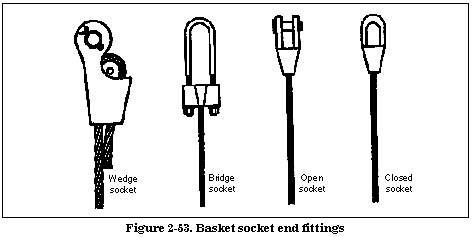
This socket is ordinarily attached to the end of the rope with molten zinc or babbitt metal and is a permanent end rifting. If this fitting is properly made up, it is as strong as the rope itself. If molten lead is used instead of zinc, the strength of the connection must be assumed to be reduced to one-fourth the strength of a zinc connection. The socket can be made up by the dry method if facilities are not available to make a poured fitting, but its strength is sharply reduced and must be considered to be about one-sixth the strength of a zinc connection. In all cases, the wire rope should lead from the socket in line with the axis of the socket.
The poured basket socket is the most satisfactory method in use (see Figure 2-54)
.
If the socketing is properly done, when a wire rope is tested to destruction, it will break before it will pull out from the socket.
The dry method should be used only when facilities are not available for the poured method (see Figure 2-55).
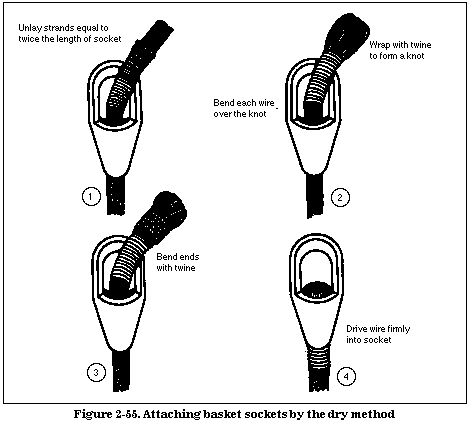
The strength of the connection must be assumed to be reduced to about one-sixth of the strength of a poured zinc connection.
The standard pipe stanchion is made up of a 1-inch diameter pipe (see Figure 2-56).
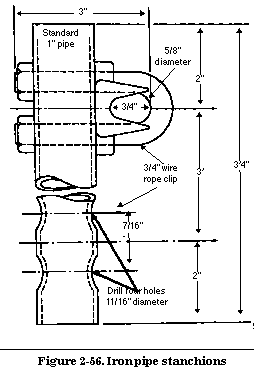
Each stanchion is 40 inches long. Two 3/4 inch wire rope clips are fastened through holes in the pipe with the centers of the clips 36 inches apart. Such a stanchion can be used without modification for a suspended walkway that uses two wire ropes on each side, but for handlines the lower wire rope clip is removed or left off. Refer to TM 5-270 for detailed information on types and uses of stanchions.
Ropes may be used in the construction of hanging ladders and standoff ladders.
Hanging ladders are made of wire or fiber rope anchored at the top and suspended vertically. They are difficult to ascend and descend, particularly for a man carrying a pack or load and should be used only when necessary. The uprights of hanging ladders may be made of wire or fiber rope and anchored at the top and bottom.
Wire rope uprights with pipe rungs make the most satisfactory hanging ladders because they are more rigid and do not sag as much as hanging ladders made of other material. Wire rope uprights with wire rope rungs are usable.
Make a wire rope ladder using either 1-inch or 3/4-inch pipe rungs. The 1-inch pipe rungs are more satisfactory. For such ladders, use the standard pipe stanchion. Space the pipe stanchions 12 inches apart in the ladder and insert the 3/4-inch wire rope clips in the stanchion over 3/4- inch wire rope uprights (see Figure 2-57).
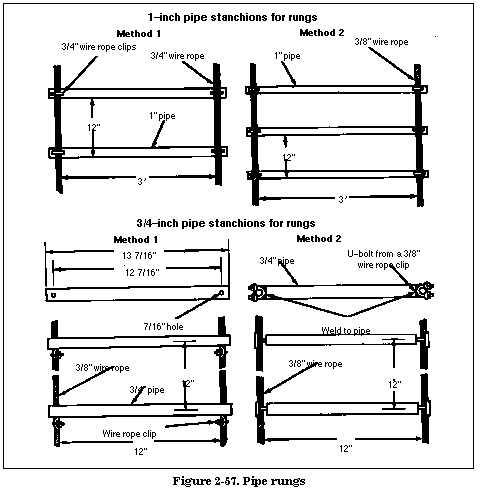
If you use 3/8-inch wire rope uprights, insert 3/8-inch wire rope clips in the pipe over the wire ropeuprights. When you use 3/4-inch pipe rungs, space the rungs 12 inches apart in the ladder but do not space uprights more than 12 inches apart because of the weaker pipe used. The rungs may be fastened in place by two different methods. In one method a 7/16-inch diameter hole is drilled at each end of each pipe rung and 3/8 inch wire rope uprights are threaded through the holes. To hold each rung in place, fasten a 3/8-inch wire rope clip about the wire rope upright at each end of each rung after the rung is in final position. In the other method, cut the pipe rungs 12 inches long and weld the U-bolt of a 3/8 inch rope clip to each end. Space the rungs 12 inches apart on the 3/8-inch wire rope uprights. Place the saddle of the wire rope clips and the nuts on the U-bolts, then tighten the nuts to hold the rungs in place.
Make a wire rope ladder with wire rope rungs by laying the 3/8-inch diameter wire rope uprights on the ground. Lay out the first length in a series of U-shaped bends. Lay out the second length in a similar manner with the U-shaped bends in the opposite direction from those in the first series and the horizontal rung portions overlapping (see Figure 2-58).
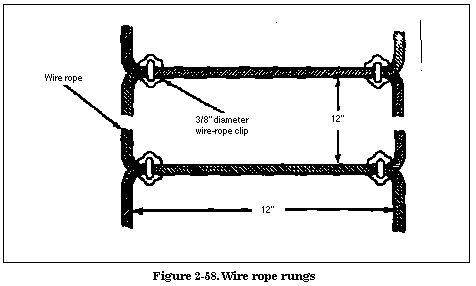
Fasten a 3/8-inch wire rope clip on the overlapping rung portions at each end of each rung to hold them firm.
Fiber rope uprights with wood or fiber rope rungs are difficult to use because their greater flexibility causes them to twist when they are being used. A log should be placed at the break of the ladder at the top to hold the uprights and rungs away from a rock face so that better handholds and footholds are provided. A single rock anchor is usually sufficient at the bottom of the ladder, or a pile of rocks can be used as bottom anchor for fiber rope hanging ladders. Fiber Rope Ladder With Fiber Rope Rungs Make fiber rope ladders with fiber rope rungs by using two or three uprights. When you use three uprights, make a loop in the center upright at the position of each rung (see Figure 2-59).
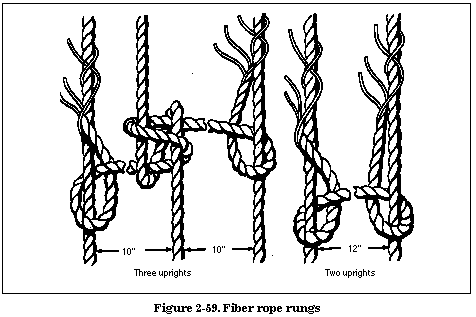
Space the two outside uprights 20 inches apart. A loop and a single splice hold each end of each rung to the outside upright. A loop in the center of the rung passes through the loop in the center upright. If you use only two uprights, hold the rungs in place by a loop and a rolling hitch or a single splice at each upright. The two uprights must be closer together, with shorter rungs, to stiffen the ladder. Ladders of either type are very flexible and difficult to climb.
Make fiber rope ladders with wood rungs by using finished lumber or native material for rungs (see Figure 2-60).
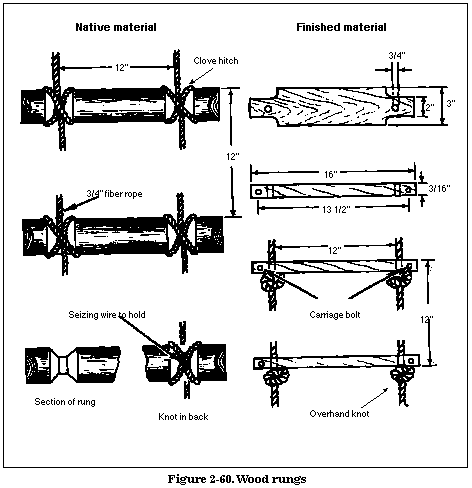
When you use native material, cut the rungs from 2-inch diameter material about 15 inches long. Notch the ends of each rung and fasten the rung to the fiber rope upright with a clove hitch. Space the rungs 12 inches apart. Twist a piece of seizing wire about the back of the clove hitch to make it more secure and in a manner that will not snag the clothing of persons climbing the ladder. If you make the rungs of finished lumber, cut them to size and drill a 3/4-inch hole at each end. Oak lumber is best for this purpose. Put a 1/4-inch by 2-inch carriage bolt horizontally through each end near the vertical hole to prevent splitting. Tie an overhand knot in the upright to support the rung. Then thread the upright through the 3/4-inch hole in the rung. Tie a second overhand knot in the upright before you thread it through the next rung. Continue this procedure until the desired length of the ladder is reached.
Standoff ladders are easier to climb than hanging ladders because they have two wood or metal uprights that hold them rigid, and they are placed at an angle. Both types of ladders can be prefabricated and transported easily. One or two standoff ladders are adequate for most purposes, but three or four hanging ladders must be provided for the same purpose because they are more difficult to use.